Turn a raw window grab into something you can publish
SnapShelf wraps any screenshot in a solid colour, gradient, or image background with adjustable padding, corner radius, and drop shadow on macOS 13+, producing a shareable product visual — included in the $49 one-time price.
Last updated
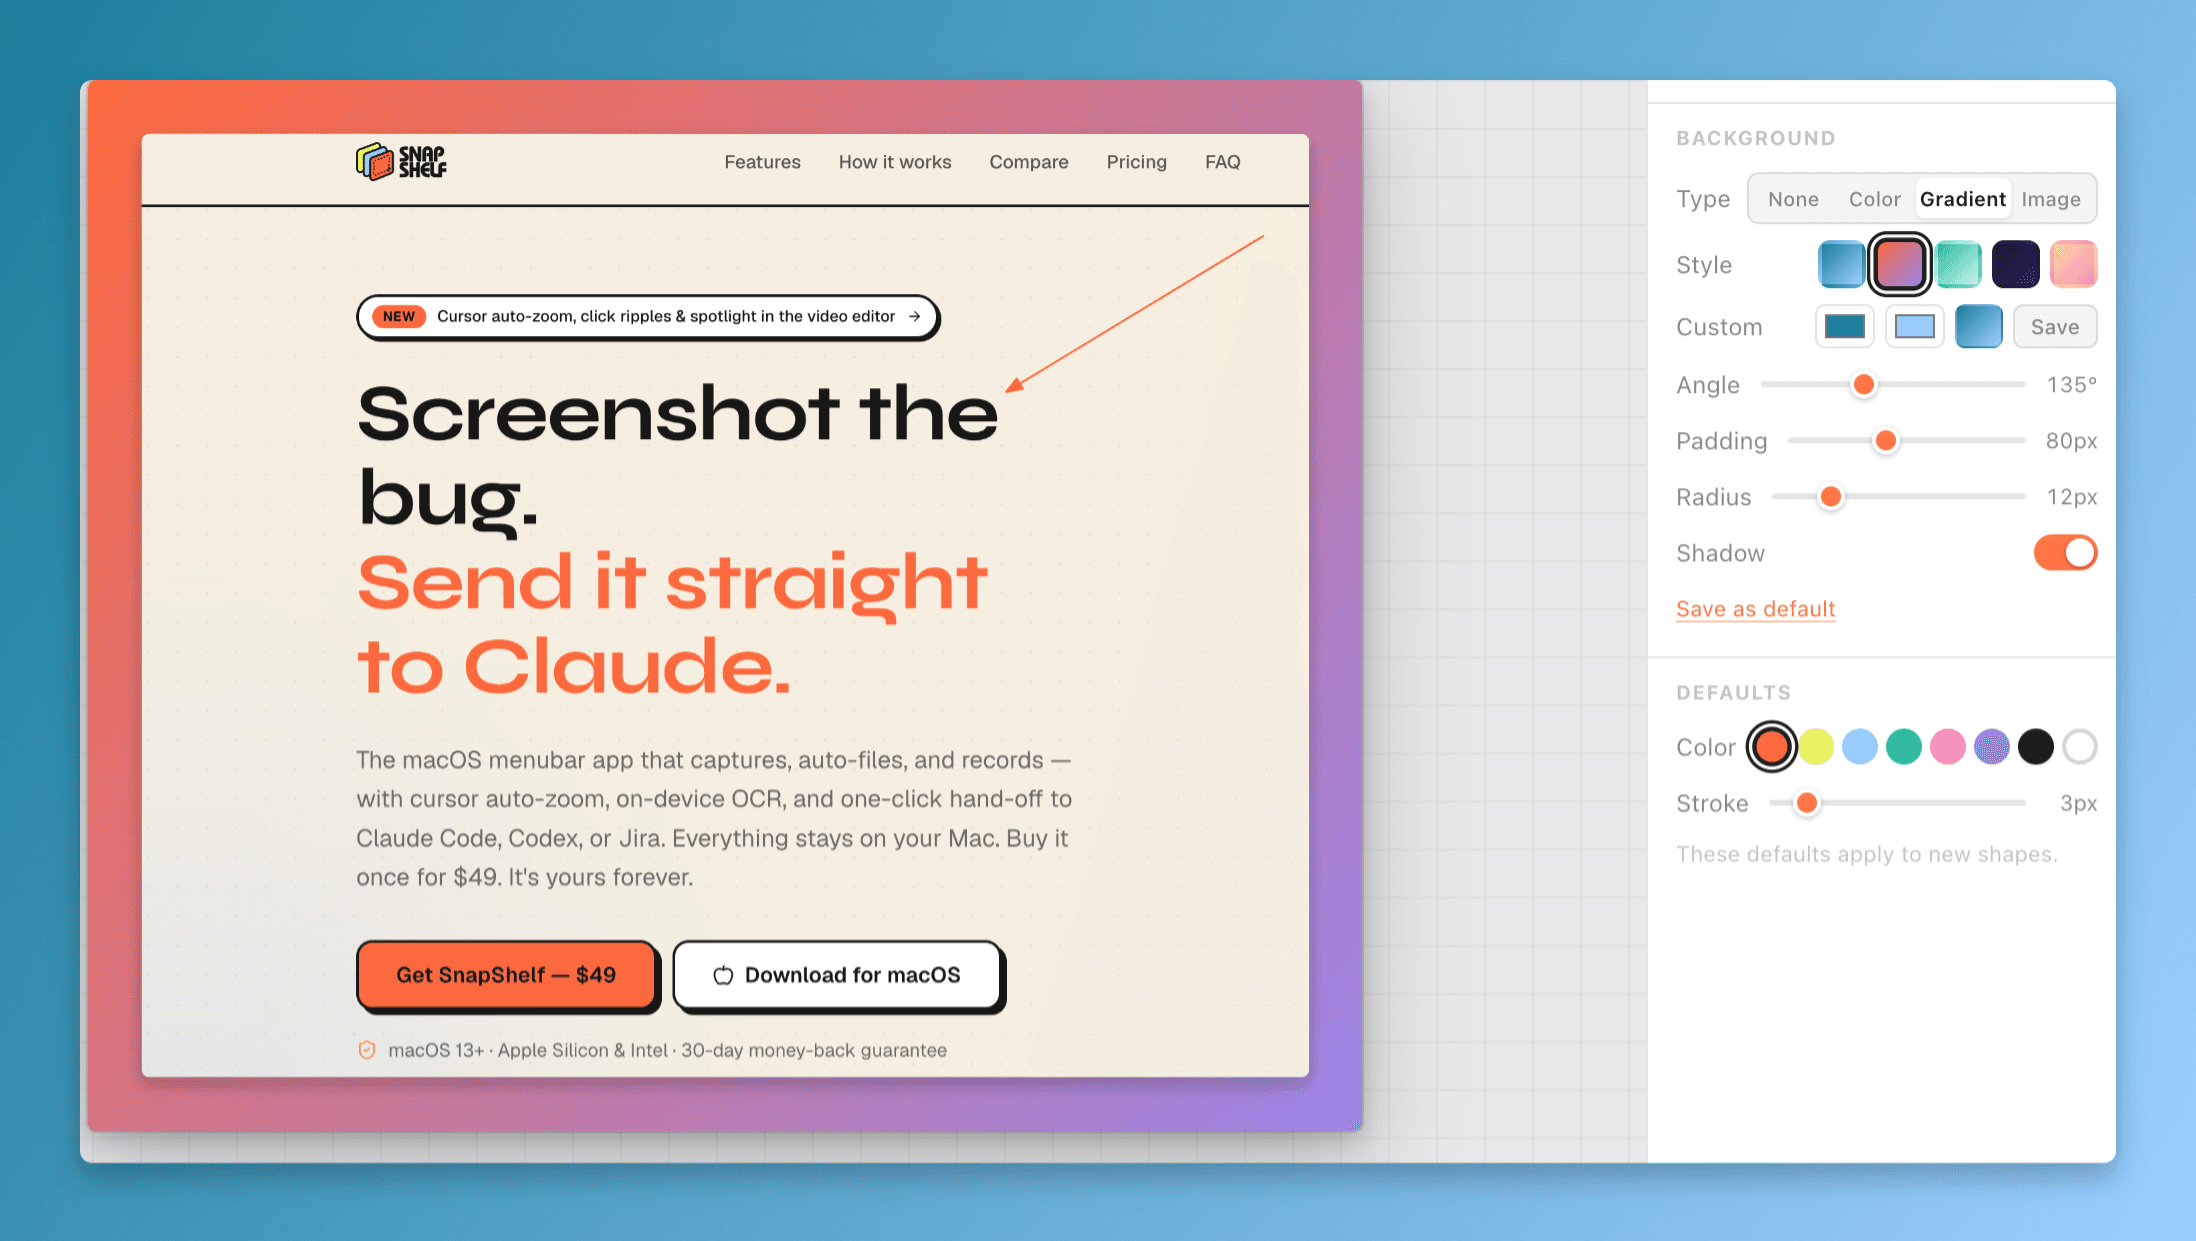
A window capture sitting on a gradient background in the SnapShelf editor, with the padding, corner radius, and shadow sliders alongside.
Why a raw screenshot looks wrong on a website
A screenshot pasted straight into a landing page, a changelog, or a social post reads as unfinished, and the reasons are mechanical rather than mysterious. The capture is a rectangle that ends abruptly at the window edge, so it collides with whatever surrounds it. It has no margin, so text sits right against the frame. The window corners are square against a page whose other elements are rounded. And it sits flat on the background with nothing establishing that it is a screen rather than part of the layout.
Four adjustments fix all of that: padding to create margin, a background to give the capture somewhere to sit, a corner radius to match the surrounding design language, and a drop shadow to lift the window off the surface. None of them are creative decisions. They are the standard treatment every product marketing page applies, and applying them takes about fifteen seconds.
SnapShelf’s Background tab does exactly those four things, with a solid colour, one of five gradient presets — ocean, sunset, mint, midnight, and peach — or an image you supply as the backdrop. If none of the five suit, a custom builder takes two colours and an angle and keeps up to twelve of your own swatches. That constraint is deliberate — this is a treatment step, not a design tool, and every additional control makes it slower to reach for.
- 1Open a capture and switch to the Background tab in the editor
- 2Choose a solid colour, a gradient preset, or upload your own image
- 3Increase padding until the capture has breathing room on all four sides
- 4Set the corner radius to match wherever this is going, and check the shadow
- 5Export — the result is on your clipboard and in your project folder
Practical settings that hold up
Pick the background colour from the screenshot itself rather than from a palette. A muted, desaturated version of a colour already in the UI reads as intentional; an unrelated brand colour reads as a sticker. Gradients work best when the two stops are close in hue and differ mainly in lightness — a wide hue sweep pulls attention away from the content, which is the opposite of the goal.
Padding should be generous. The common failure is too little: eight pixels of margin looks like a mistake, whereas padding at roughly five to ten per cent of the capture’s width looks composed. If the result is going into a social post, err further towards generous, because the platform will crop and scale it.
Match the corner radius to the destination, not to taste. macOS window corners already have a radius; adding a much larger one to a full-window capture produces a double-rounded edge that looks off. For a cropped region capture with square corners, a small radius reads as a card and is usually right. And treat the shadow as structural: a soft, low-opacity shadow with a slight downward offset says "this floats above the page". A hard black shadow says 2009.
What macOS does, and the gap
There is one piece of this macOS gives you for free and it is easy to miss. Press ⌘⇧4 then Space and click a window, and macOS captures that window with transparent margins and the standard system drop shadow already applied. That is a genuinely good default: the shadow is correct, the corners are correct, and it composites cleanly onto any background because the surrounding area is transparent. For a lot of uses, that plus a coloured div behind it in your CMS is all you need.
What macOS has no concept of is the background itself, or padding, or a radius you control. To add those you are opening the PNG in Preview — which cannot easily place an image behind another image — or in a real design tool. That means Figma or Photoshop for a task that is four sliders, which is why most people skip it and post the raw capture.
So the gap is not capability, it is the number of applications between you and a fifteen-second treatment.
Xnapper does this well, and it is cheaper
Xnapper ($17 one-time, verified July 2026, subject to change) is built around this exact job and is very polished at it — one-click social-media presets, deliberately simple, minimal learning curve. If beautified screenshots are the only thing you need, Xnapper is cheaper than SnapShelf and focused on precisely that. That is a real answer, not a courtesy.
SnapShelf covers the same treatment — solid, gradient, and image backgrounds with padding, rounded corners, and shadows — inside an editor that also does arrows, lines, pen, highlighter, blur, step badges, crop, and OCR, on captures held in an auto-filed searchable gallery, next to a screen recorder and a video editor. The $32 difference buys the rest of the workflow, not a better background tool.
Screen Studio ($89) has automatic device frames and wallpaper-style backgrounds for recordings, which is the video equivalent of this and something SnapShelf does not match. CleanShot X has the deepest still-image annotation toolset in the comparison. If you want the single best tool for one narrow job, in most cases it is not SnapShelf — the case for SnapShelf is that one $49 purchase covers all of these jobs adequately and a few of them uniquely.
Try SnapShelf
$49 once — 2 years of free updates, no subscription, and everything stays on your Mac. 30-day money-back guarantee.
macOS 13+ · Apple Silicon & Intel
FAQ
Questions, answered
Everything you need to know before buying.
Yes. The Background tab takes a solid colour, one of five gradient presets — ocean, sunset, mint, midnight, peach — a custom gradient you build from two colours and an angle, or an image you upload, and layers the capture on top with your padding, corner radius, and shadow settings.
Stop hunting for screenshots. Start shipping.
Every capture filed, annotated, recorded with cursor auto-zoom, and one right-click away from your Claude Code session. One-time $49, yours forever.
30-day money-back guaranteeOne-time purchase2 years of free updatesLocal-only datamacOS 13+ · Apple Silicon & Intel